まだまだリリースは先なBlender2.8ですが、ベータ版が公開されてからはだいぶ安定して使えるようになってきている感じがあります。
そんな中、ちょっとBlender2.8でアドオンを作ってみるか、と思い立って作ってみたのでその備忘録です。
基本的にはBlender2.79でアドオンを作ったことある人向けで書きますが、最後にBlender2.79時代のアドオン作成備忘録の記事も載せておくのでわからない場合はそちらも参照してみてください。
では始めます。
1:Blender2.8のBlender Python API Documentation
まだ開発中のBlender2.8ですが、アドオンに必要なPython APIについてはほぼほぼ確定しているようです。
すでにBlender2.8のPython API Documentationができているので、詳しいAPIの内容は以下を参照してください。
2:Blender2.79とBlender2.8でのアドオン記述の違い
まず前提としてBlender2.79のアドオンはBlender2.8では使えません。
Blender2.79のアドオンをBlender2.8で使うには必ずプログラムの修正が必要になります。
・2−1:アドオンの情報部分
アドオンの情報を記述する「bl_info」にある、対応するBlenderのバージョン部分を2.8に合わせた書き方に修正する必要があります。
bl_info = {
    "name": "hogehoge", # アドオン一覧に表示される名前
    "author": "author",  # 作者
    "version": (1, 0), # アドオンのバージョン
    "blender": (2, 80, 0), # 対応するBlenderのバージョン(ここが「(2, 79, 0)」のような記述だとエラーになる)
    "location": "",
    "description": "hogehogehoge", # アドオンの説明
    "warning": "",
    "support": "TESTING", # アドオンの分類
    "wiki_url": "",
    "tracker_url": "",
    "category": "Material" # カテゴリー
}
・2−2:モジュールの登録/解除部分
Blender2.79までは以下のような書き方でモジュールを登録/解除していました。
・旧モジュール登録/解除
import bpy

# アドオンについての説明
bl_info = {
    # 省略
}

# アドオンのクラス
class Hoge(bpy.types.Operator):
    # 省略

    def execute(self, context):
        # 省略
        return {'FINISHED'}

# メニューを構築する関数
def menu_fn(self, context):
    self.layout.separator()
    self.layout.operator(Hoge.bl_idname)


# アドオン有効化時の処理
def register():
    bpy.utils.register_module(__name__)
    bpy.types.VIEW3D_MT_object.append(menu_fn)
    print("Add-on:ON")


# アドオン無効化時の処理
def unregister():
    bpy.types.VIEW3D_MT_object.remove(menu_fn)
    bpy.utils.unregister_module(__name__)
    print("Add-on:OFF")

# メイン関数
if __name__ == "__main__":
    register()
アドオンのクラスを記述したあとに「def menu_fn(self, context):」部分で追加するメニュー部分を、「def register():」でアドオン有効化時の処理、「def unregister():」でアドオン無効化時の処理を記述するという書き方でした。
Blender2.8ではその記述の仕方が一新され、以下のようにより記述しやすくなりました。
・新モジュール登録/解除
import bpy

# アドオンについての説明
bl_info = {
    "name": "sample: add-onTest",
    "author": "ssss",
    "version": (2, 0),
    "blender": (2, 80, 0),
    "location": "location",
    "description": "sample",
    "warning": "warning",
    "support": "TESTING",
    "wiki_url": "http://hogehoge.com",
    "tracker_url": "http://hogehoge2.com",
    "category": "Object"
}

# UI(ボタンを構築するクラス)
class UI(bpy.types.Panel):
  bl_label = "add sphere panel"
  bl_space_type = "VIEW_3D"
  bl_region_type = "UI"

  def draw(self, context):
    self.layout.operator("add_sphere_object.button")

# アドオンのクラス
class AddSphere(bpy.types.Operator):
    bl_idname = "add_sphere_object.button" # ID
    bl_label = "Add Sphere" # メニューに追加されるラベル
    bl_description = "Add Sphere" # 関数の説明
    bl_options = {'REGISTER', 'UNDO'} # 処理の属性

    def execute(self, context):
        bpy.ops.mesh.primitive_ico_sphere_add()
        print("Add Sphere End") # コンソールにログ出力
        self.report({'INFO'}, "Add Sphere End")
        return {'FINISHED'}

# クラスをまとめる
classes = (
  UI,
  AddSphere
)

# まとめたクラスを一度に登録
register, unregister = bpy.utils.register_classes_factory(classes)
クラスをまとめて「classes = (クラス名, クラス名...)」として、それを「register, unregister = bpy.utils.register_classes_factory(classes)」とすることで一気にクラスを登録します。
この書き方をすることでかなり短い行数で記述することができるようになっています。
これらの他にもいくつか変更点があるようですが、全体に影響する大きな変更はこの2点ぐらいです。
他の変更は以下のページにまとめられているので各自で確認するようにしてください。
3:自作したアドオン
今回Blender2.8で自作したアドオンは以下になります。アドオンの内容としては「グリースペンシルでのMaterialのStrokeの色をFillの色にコピーする」というものです。
コピペして「copyStrokeColorToFillColor.py」のファイル名で保存してからアドオンとしてBlenderにインストールすれば使えます。コピペが面倒な場合は記事の後の方でファイルのダウンロードリンクを貼っておくのでそこからダウンロードしてみてください。
・copyStrokeColorToFillColor.py
#
# グリースペンシルのMaterialのStrokeの色を
# Fillの色にコピーするアドオン
#
import bpy

bl_info = {
    "name": "Copy Stroke color to Fill color", # アドオン一覧に表示される名前
    "author": "whip",  # 作者
    "version": (1, 0), # アドオンのバージョン
    "blender": (2, 80, 0), # 対応するBlenderのバージョン
    "location": "",
    "description": "copy Stroke color to Fill color", # アドオンの説明
    "warning": "",
    "support": "TESTING", # アドオンの分類
    "wiki_url": "",
    "tracker_url": "",
    "category": "Material" # カテゴリー
}

# UIに関するクラス
class CopyColorUI(bpy.types.Panel):
  bl_label = "Copy Stroke color to Fill"
  bl_space_type = "PROPERTIES"
  bl_region_type = "WINDOW"
  bl_context = "material"

  def draw(self, context):
    self.layout.operator("copy.button") # ボタンを作成

# ボタンに関するクラス
class CopyColor(bpy.types.Operator):
  bl_idname = "copy.button"
  bl_label = "copy color"
  bl_options = {'REGISTER', 'UNDO'} # オブション

  # ボタンが押された時に実行される処理
  def execute(self, context):
    # 色をコピー
    lineColor = bpy.context.object.active_material.grease_pencil.color
    bpy.context.object.active_material.grease_pencil.fill_color = lineColor
    self.report({'INFO'}, "copy end") # Blenderのログに出力
    return{'FINISHED'}

# クラスをまとめる
classes = (
  CopyColorUI,
  CopyColor
)

# まとめたクラスを一度に登録
register, unregister = bpy.utils.register_classes_factory(classes)
アドオンのインストールが済んだら「Preferences」画面の「Add-ons」→「Testing」タブを開くと「Copy Stroke color to Fill color」というのがあるはずなので、それにチェックを入れます。

これでアドオンが有効になります。
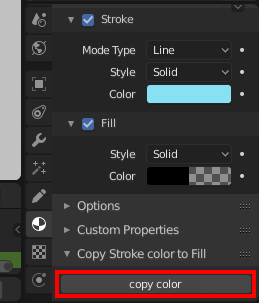
アドオンが有効な状態だと、2D Animationタブを開いた画面の「Material」の項目の最後に「Copy Stroke color to Fill」という項目が追加され、その中に「copy color」ボタンが表示されます。

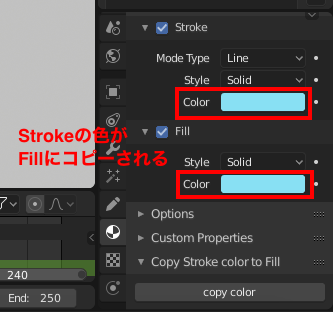
使い方としては、例えば以下のようにStrokeの色とFillの色が違っている状態でこの「copy color」ボタンを押すとFillの色がStrokeの色と同じになります。(アルファ値も同じになります)


以上が今回Blender2.8で作成してみたアドオンになります。
ボタンの追加方法とかはまた色々と面倒になるかと思うので、後々記事にでもしようと思います。
今回作成したアドオンのファイルは以下からダウンロードできるので、ご自由にどうぞ。
・参考資料
- Blender Python API Documentation — Blender 2.80.39 cd36f546114f Python API
- Blender の UI スクリプト集
- Blender 2.79 のスクリプトを 2.80 にアップデートする
・Blender2.79時代のアドオン関連記事